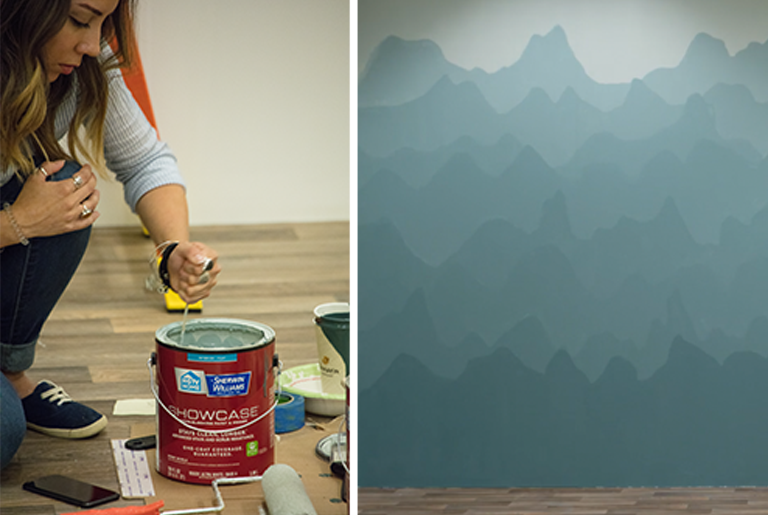
Don’t have the budget or time right now to go on a relaxing getaway? Create a retreat in your own home! Paint this soothing, fun, easy mountain mural in your living room or bedroom that will make you and your guests feel like you’re on vacation!
Supplies Needed
– 2 gallons of paint, colors of your choice – both the same shade. One dark and one approximately eight shades lighter
– pencil
– tape or sticky notes
– paint brushes – small for the edges in between, larger for filling in
– stirring stick
– 8 oz cup
– ladder- if you’re short like me!
1. Sketch out your mountains
You don’t have to be an artist for this, I promise! Draw mountains with a pencil on your blank wall. They can be as round, sharp, tall or short as you want, make it uniquely yours! Start either at the top of the bottom and work your way to the other end. Have some of the mountains overlap the others to add dimension and visual interest. I did nine layers, but you can do more or less!

2. 1-2-3-Number your sections
Use pieces of tape or sticky notes and stick them in any section that you may feel could confuse you when figuring out which color goes where! Number them by section – bringing back the childhood days when you’d color according to numbers!

3. Time for color
Begin painting! Start at the top with your lightest color. I traced the pencil line first with the thin brush so that it creates a border for you to fill in the rest. Paint, paint, paint! Let it dry for 10-15 minutes before starting each layer to avoid smudging.

4. Create your shades – mix the colors
Take the cup and dip it in the dark paint filling it ¾ full. Pour it into the light gallon paint and mix away. Once fully mixed, decide if you want to add another ½ cup, but no more than that! (the paint usually dries darker than it looks!)

5. Paint, paint, paint
Outline the section below it, making sure to pay attention to the numbers so that you paint the correct section with the right shade! Continue to fill in that section.

6. Repeat!
Repeat steps 4-5 until you have your finished mountain mural!

